This two parts post was originally published in the official magazine of Autodesk User Group International, AUGIWorld.
Most examples of Dynamo focus on computational design and complex geometries. Many see Dynamo as a tool for creating complex geometry, and consider it from an architectural perspective. But Dynamo can be the powerful ally of every trade, all along the project life. By harnessing the data manipulation capabilities of Dynamo, you can largely improve on the current calculation features of Revit, and create new workflow for designing directly in Revit.
Through five use cases, I will present you some ideas for using Dynamo for mechanical engineering.
I will assume that you are already familiar with the interface and have a general understanding of how Dynamo works. Most examples below can be realized with “out of the box” Dynamo nodes, but to shorten my graph, I will make use of the following packages:
- Grimshaw, from Konrad K Sobon
- Steam Nodes, from Julien Benoit
I will also use my own package, DynamoMEP, to manipulate Rooms and Spaces. All these packages are of course freely available on the Dynamo Package Manager. If Dynamo doesn’t include a lot of functionalities around Room, Space and Mechanical Equipment, I use extensively the Package Manager to enhance these functionalities and create new workflows for mechanical engineers.
A final word, try these examples on small models before running them in production, and work in “Manual” mode, a few graph I will use are quite hungry for memory.
Link between Room and Spaces
Rooms and Spaces are essential for everything from room names and numbers to energy modeling. And before anything else, you have to retrieve any architectural room and convert it into an MEP Space to be able to work with it. You can of course use the “Place Spaces automatically” function of Revit, but this does not match exactly every architectural room with a MEP Space, and lack some basic functionalities. To improve on this, you can use a few Dynamo nodes to create a MEP Space for every room in a given linked file.
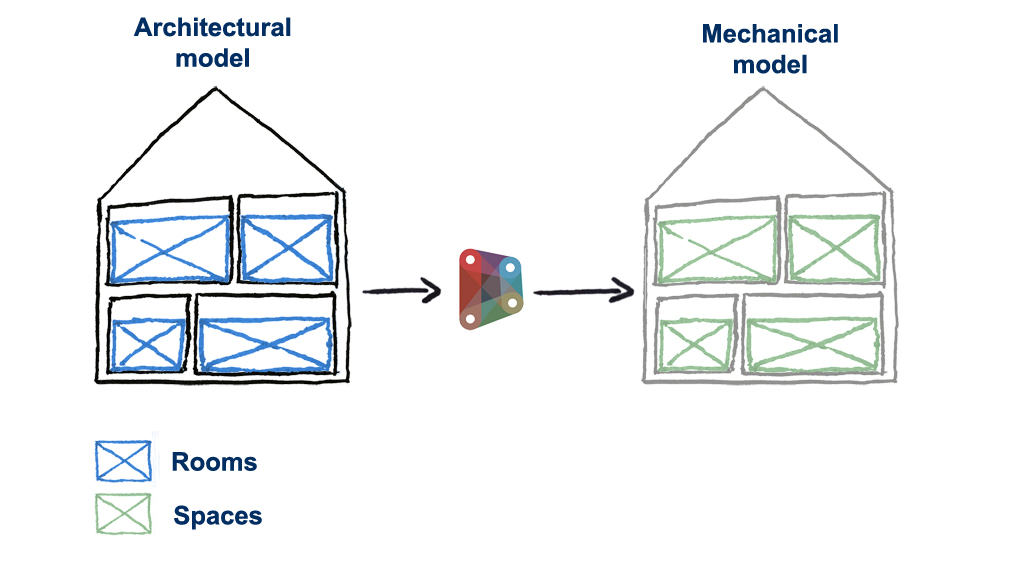
The procedure focus on retrieving every room from the architectural linked file (with the Element.GetFromLinkedFile) and using these rooms to create a matching space using the Space.ByPoint node from DynamoMEP.
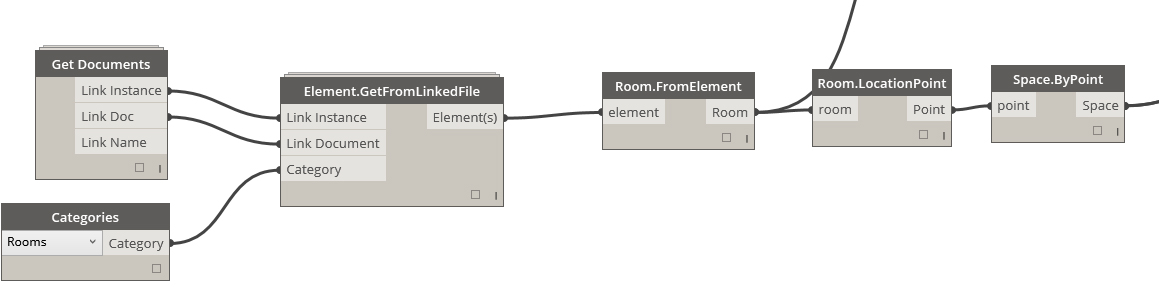
You can also retrieve parameters values from these architectural rooms and paste them into your newly created Spaces using the Element.SetParameterByName node.
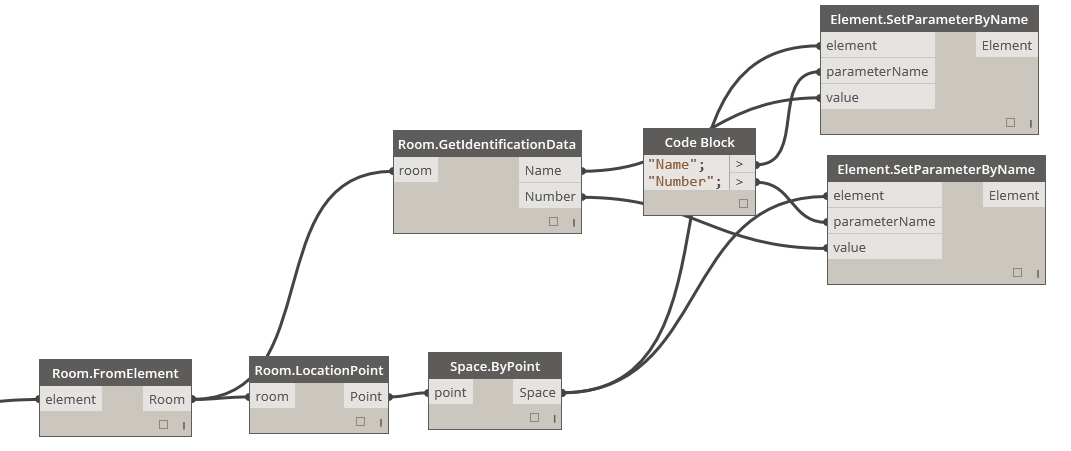
As rooms evolve in the architectural model, you will be able to recreate on the fly the corresponding Spaces. However, be careful not to duplicate an existing space.
Link between Excel and Spaces
One of the most featured use of Dynamo is the link with Excel spreadsheets. Theses nodes link two of our most used design tools, Excel and Revit.
For the mechanical engineer, this provide the ability to add programmatic values directly in Revit Spaces. In the following example, I will show you how to load the specified airflow value from an Excel spreadsheet. I will make extensive use of Dynamo lists, and present some ways to manipulate them.
We start with a path to an Excel file, and use it to feed the Excel.ReadFromFile node. This node read line by line the content of our Excel file. We remove the first line, the header, with the List.RestOfItems node, and use the Transpose node to convert our list of Excel rows into a list of Excel columns. By now, each list in our Dynamo node represent an Excel column.
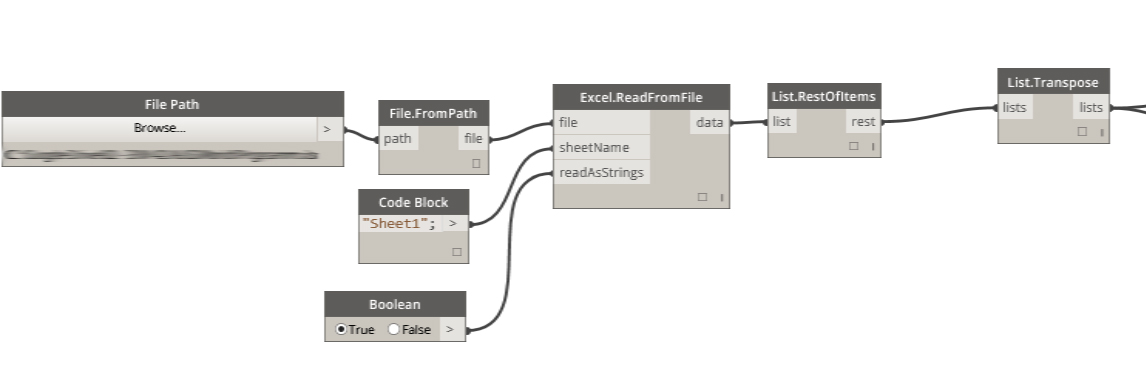
With the List.GetItemAtIndex, we retrieve a list containing all MEP Space number and a list with their associate airflow.
To feed the “Specified Supply Airflow” parameter of our modeled Spaces, we need match them with the Space number in our Excel spreadsheet. To do so, we start by retrieving them (All Element of Category node), and get their number (Element.GetParameterValueByName).
The node List.FirstItemOf give us the row number of each of these Space Number in our Excel file. For each of our existing MEP Space in our model, we can now get the corresponding row in Excel.

Using the List.GetItemAtIndex, we get the required Airflow value in the Excel Spreadsheet. Before pasting them into Revit with the Element.SetParameterByName, we convert them to cubic foot, since Dynamo always work in Feet.
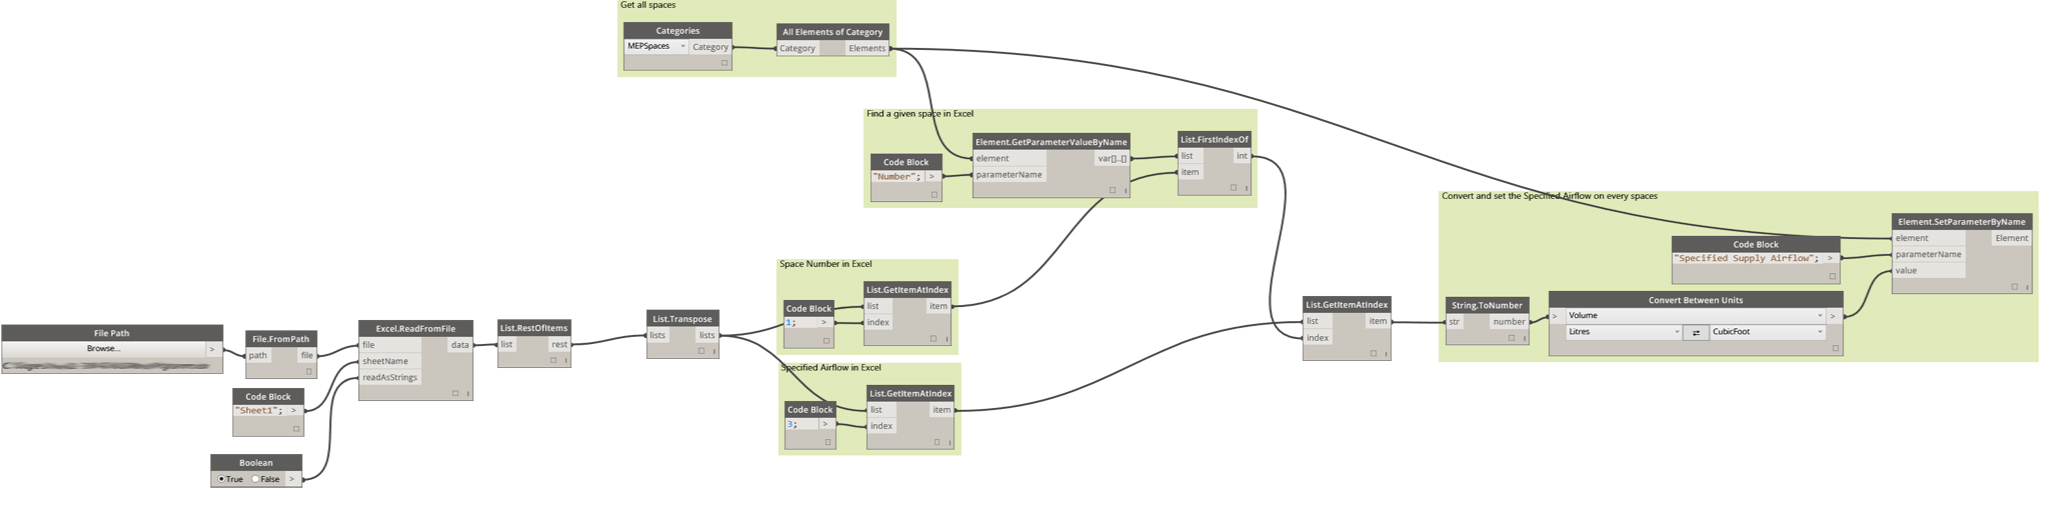
The entire business of retrieving values from Excel spreadsheet is generally only a matter of list, and nodes like Transpose, GetItemAtInded and FirstIndexOf are quite useful here. If this example only cover the specified airflow, it can of course be extended to every kind of data sorted in an Excel spreadsheet.
Just make sure that your MEP Space numbers match between your Excel file and your Revit model, since any discrepancy will make the FirstIndexOf fail.
Next week, stay tuned for the second part of this post, where all secrets of airflow and terminals will be revealed.