In September 2011, Autodesk make accessible the Industry Foundation Classes (IFC) exporter for Revit as open source code, licensed through a LGPL v. 2.1 licensing agreement. In 2014, this project evolved to include IFC import as well, and was named “IFC for Revit”.
This source code is available on Source Forge, and everyone can contribute to the part of Revit that deal with IFC.
This source code is now the built-in IFC engine for Revit, and I was told that this engine is also behind the conversion service available through Forge.
When the user clicks on Export to IFC, an even is triggered, and Revit catch this even to run the IFC exporter. This also works when the event is triggered by the Document.Export() used through the Revit API by a third-party add-on, like the one I built last week. This IFC Export engine will then read the Revit model, convert every element into its IFC counterpart, and write the resulting IFC file.
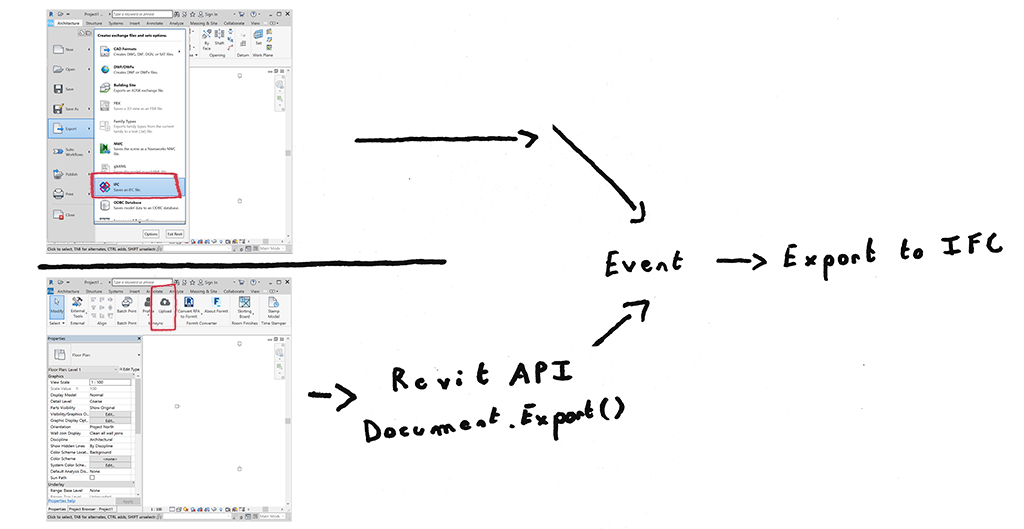 How Revit export to IFC
This IFC engine comes with a special UI, the IFCExporterUI, designed to tap into the capabilities of the open-source IFC exporter to give you more control over the configuration of your export.
There are different add-ons for each Revit version, and each new release of Revit is shipped with the most up-to-date IFC engine available at the time. However, the code for this engine evolve quickly, and you can always download the latest version as an add-on on the Autodesk App Store.
At the time of writing, the landscape looks like this:
| Revit Version | Built-in IFC Exporter version | Latest IFC Exporter version (with the Revit IFC add-on) |
| 2016 | Exporter 16.0.490.0 - Default UI | Exporter 16.6.0.0 - Alternate UI 16.6.0.0 |
| 2017 | Exporter 17.0.1081.0 - Alternate UI 17.14.0.0 | Exporter 17.4.0.0 - Alternate UI 17.4.0.0 |
| 2018 | Exporter 18.0.0.420 - Alternate UI 18.0.0.420 | Exporter 18.2.0.0 - Alternate UI 18.2.0.0 |
If you want to know witch version you have, you can check it by opening an IFC file with a text editor and look among the first lines, the FILE_NAME one:
 Check you exporter version
I didn’t dig into the subtleties of the different flavors of each Revit version, like R2 and other exotic name, you get the picture.
Last week, I published a Revit add-on to send a model to bimsync. Under the hood, this add-on exports the Revit model to IFC before uploading it to bimsync. As I was building my add-on, I realized that I couldn’t just use the Document.Export() function with whatever IFC export settings Revit could provide me. To be useful, such an add-on must allow the user to set up his own IFC Export configuration.
I look into the code of the IFC Exporter UI to understand how this user interface communicate with the export engine. I found out that you need an IFCExportConfiguration class to use a specific IFC Export configuration. Below is an example of the code needed to export a Revit model to IFC:
//Create an instance of IFCExportOptions
IFCExportOptions IFCOptions = new IFCExportOptions();

//Get an instance of IFCExportConfiguration
IFCExportConfiguration selectedConfig = modelSelection.Configuration;

//Get the current view Id, or -1 if you want to export the entire model
ElementId activeViewId = GenerateActiveViewIdFromDocument(doc);
selectedConfig.ActiveViewId =
        selectedConfig.UseActiveViewGeometry ? activeViewId.IntegerValue : -1;

//Update the IFCExportOptions
selectedConfig.UpdateOptions(IFCOptions, activeViewId);

string folder = "A path to a folder where you want to save your IFC file";
string name = "the name of your IFC file";

//Export the model to IFC
doc.Export(folder, name, IFCOptions);
You start by creating an instance of the IFCExportOptions found in the Autodesk.Revit.DB namespace. This is standard in all Revit flavors.
Then, you retrieve or create an instance of the IFCExportConfiguration class. This is a class provided by the IFC Export add-on that hold every aspect of your export configuration, from knowing if you want to export the BaseQuanties to the path to the IfcPropertySets mapping files.
You get the Id of the active view and use the UpdateOptions method of IFCExportConfiguration to pass it along with all other properties to the IFCExportOptions.
The IFC Export add-on also provide an IFCExportConfigurationsMap class to get the built-in configurations and store the new ones.
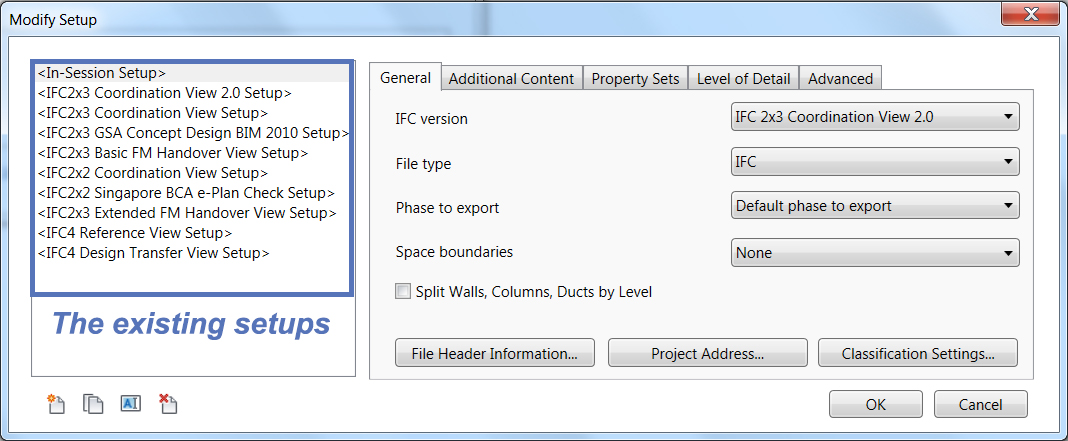 The existing export setups
But where find these IFCExportConfiguration and IFCExportConfigurationMaps classes ?
If the IFC for Revit add-on is installed, you can find these classes in the IFCExporterUIOverride.dll. This dll can be found in your ApplicationPlugins folder, in the IFC plugin install folder (C:\ProgramData\Autodesk\ApplicationPlugins\IFC 2018.bundle\Contents\2018)
Running this on a Revit equipped with the add-on will work nicely, but it will fail miserably when the user doesn’t have the IFC for Revit add-on. In this case, the add-on can’t find the IFCExporterUIOverride.dll containing the IFCExportConfiguration class:
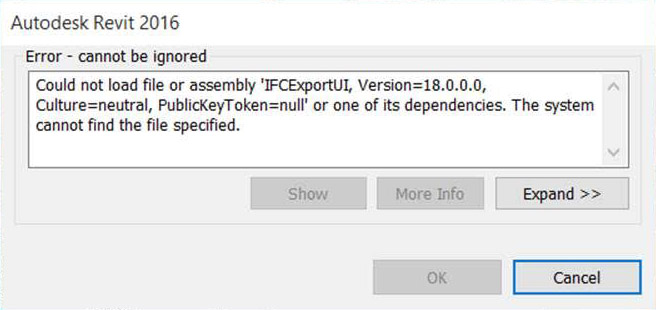
Using IFCExportConfiguration without the add-on
If you have a Revit version with the IFC Exporter UI built in (Revit 2017 or 2018), the IFCExportConfiguration and IFCExportConfigurationMaps classes can be found in the IFCExportUI.dll, located in your Revit installation folder (C:\Program Files\Autodesk\Revit 2018\AddIns\IFCExporterUI). In this case, the features available are the same than our previous case, but are in a different dll.
If you don’t have the IFC Exporter UI at all (Revit 2016 and earlier versions), you must fall back to the basic export options.
In a nutshell, we have to manage these three cases:
| Class | DLL | Revit version |
| IFCExportConfiguration | IFCExporterUIOverride.dll In C:\ProgramData\Autodesk\ ApplicationPlugins\IFC 2018.bundle\Contents\2018 | All Revit version equipped with the IFC for Revit add-on |
| IFCExportConfiguration | IFCExportUI.dll In C:\Program Files\Autodesk\Revit 2018\AddIns\IFCExporterUI | Revit 2017 and 2018 without the IFC for Revit add-on |
| IFCExportOptions | RevitAPI.dll In C:\Program Files\Autodesk\Revit 2018 | Revit 2016 and earlier without the IFC for Revit add-on |
To manage these different cases, I created my own export configuration class, named IFCExportConfigurationCustom. This class handle the configuration of the export and is an interface between my code and the possible IFC export options.
I load in my Visual Studio solution the two dll containing the IFCExportConfiguration class, and using alias, I call a different version of it depending on the installation of the user:
IFCExportUI::BIM.IFC.Export.UI.IFCExportConfiguration
IFCExportUIOverride::BIM.IFC.Export.UI.IFCExportConfiguration
I also handle the vanilla Revit 2016 in my IFCExportConfigurationCustom class, without using any version of the IFCExportConfiguration (which is not available in this version of Revit), using instead the plain old IFCExportOptions built-in into Revit.
By managing the different possibilities of the Revit installation, I am able to make use of the best configuration available to export IFC. I am also able to use directly the Setup configuration interface available in the custom UI, and retrieve these user-defined export setups in my add-on.
If you plan on building your own Revit add-on to upload IFC models to a cloud service, don’t hesitate to look into the source code behind this article, the solution can be found on bimsync4Revit.
By opening the source code of its IFC engine, Autodesk make an underrated effort toward interoperability. Even if it’s obviously not for every Revit user, I think that everyone who rely on the Revit IFC export for its own software should look at this engine to get a full understanding of the possibilities offered by this exporter.